martes, 19 de octubre de 2010
Stage2 prototype #2 Presure test
English
On Friday October 12 we made a test of the prototype test #2 of the second stage or "Stage2", a month earlier, had done a pressure test with the prototype #1 with the result: withstand pressure 7 bar.This test was made with a prototype nozzle mounted, seeing the bad result of this test having been made by injecting pressurized air directly with a pressure gun without any insulation and bearing in mind that the can would have to withstand very high pressure was decided to change the course of action and thought a more reliable way of introducing air under pressure and who had not lost, this is to replace the prototype for a fitting nozzle, this helps us to hold a high-pressure hose a clamp.
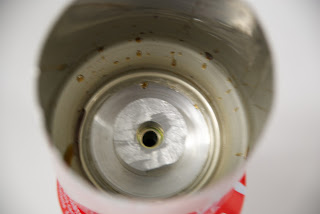
Prototype #2: (see picture #1 & 2) This is a coca-cola can which you have removed one of the covers and which are carried for a hole in the other, is inserted through the side without the connector attached to cover an aluminum support for the open side are fitted with a tin lid inside another sealed with resin and fiber epoxy inside and out, on the side of fitting only epoxy resin is applied on the outside, serious side connector the "ass" of the can.
Pressure Test: (See picture #3 & 4) For this test requires the Settings Stage2 "pressure test" (ie replacing the nozzle for a fitting), a bottle of air, nitrogen, compressed argon (in our case nitrogen), a hose capable of withstand high pressures, a manometer (we use a pressure reducer that reaches up to 34 bars) and a safety deposit box in case there are violent explosions, this should be a thick resistant material such as wood, steel, etc.Security is very important so you must maintain the placement of the elements used in the test to prevent further damage.
Test result: (see picture #5 to 8) we see that the can begin to warp from the 20 bars by the "ass" where the fitting until, at about 25 bars, this gives no break but causing leaks from the resin no longer acts as sealant.
Castellano
El viernes 12 de octubre hicimos una prueba de test del prototipo #2 de la segunda etapa o "Stage2", un mes antes se habia hecho una prueba de presión con el prototipo #1 con el resultado: Presión soportada de 7 bares.
Esta prueba se hizo con un prototipo de tobera montado, viendo el mal resultado de la prueba habiendose hecho esta inyectando aire a presión directamente con una pistola a presión sin ningún tipo de aislante y teniendo en cuenta que la lata tendria que soportar una presión bastante elevada, se decidió cambiar el modo de proceder y se pensó una manera más fiable de introducir aire a presión y que no hubieran perdidas, esta es la de sustituir el prototipo de tobera por un racor, este nos ayuda a sujetar una manguera de alta presión mediante una abrazadera.
Prototipo #2: (ver picture #1 & 2) Se trata de una lata de coca-cola a la que se le han extraido una de las tapas y en la que se le practica un agujero en la otra, se inserta por el lado que no tiene tapa el racor unido a un soporte de aluminio, por el lado abierto se les coloca una tapa de otra lata por dentro sellandola con resina epoxy y fibra por dentro y por fuera, en el lado del racor solo se le aplica resina epoxy por fuera, el lado del racor seria el "culo" de la lata.
Test de presión: (ver picture #3 & 4) Para este test se requiere del Stage2 en configuración "prueba de presión" (esto es sustituyendo la tobera por un racor), una botella de aire, nitrogeno, argon comprimido (en nuestro caso és nitrógeno), una manguera capaz de soportar altas presiones, un manometro (nosotros utilizamos un manoreductor que llega hasta una presión de 32 bares) y una caja de seguridad que debe ser de un material resistente ya sea madera gruesa, acero, etc.
La seguridad es muy importante así pues se debe cuidar la colocación de los elementos usados en el test para evitar daños mayores.
Resultado del test: (ver picture #5 a 8) vemos que la lata empieza a deformarse a partir de los 20 bares por el "culo" donde está el racor hasta que, a unos 25 bares, este cede sin romperse pero ocasionando fugas debido a que la resina ya no actua como sellante.
Pictures (Fotos):
Picture #1
Picture #2
Picture #3
Picture #4
Picture #5
Picture #6
Picture #7
Picture #8
Suscribirse a:
Enviar comentarios (Atom)


No hay comentarios:
Publicar un comentario