martes, 30 de noviembre de 2010

Stage2 third burn


English
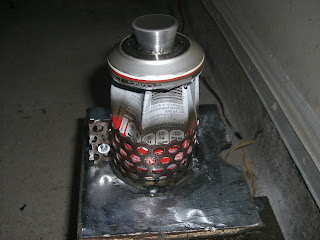
Following the validation of the stage2 we got to the third version of it. In this third prototype we decided to move to higher and place the savage amount of 7 grains (1 plant with its encapsulation of cardboard and its nozzle and 6 around without encapsulation or nozzle) with this configuration we reach the maximum capacity of the can. At first it wanted to put 8 grains (1 in the center and 7 around) but it was impossible to enter and so we opted for the 7-grain configuration. These 7 grains are not subject to the anothers and the can only be diposit a little resin on the bottom to support the central grain. Only the central grain is expected to igniter and the other 6 are switched to heat, pressure and fire to detach it. The can is coated with epoxy resin in order to support higher temperatures. 

Test: The test is still the same, turn on the stage and see how it reacts. 

Test result: The igniter works and lights up the stage this, but exploits a few moments of ignition by blowing up the grains that were not subject these to not be exposed to any pressure, which burned paper. 

Test conclusions: very important to hold ALL the grains so that if there is an explosion (as in our case) they do not go flying around.


Castellano
Siguiendo con la validacion de la segunda etapa llegamos a la tercera versión de la misma. En este tercer prototipo decidimos pasar a mayores y colocar la bárbara cantidad de 7 granos (1 central con su encapsulado de cartón y su tobera y 6 a su alrededor sin encapsulado ni tobera) con esta configuración llegamos a la capacidad máxima de la lata. En un principio se querian poner 8 granos (1 en el centro y 7 al rededor) pero fué imposible hacer que entraran y por eso se optó por la configuración de 7 granos. Estos 7 granos no estan sujetos entre si y la lata, solo se diposita un poquito de resina en el fondo para soportar el grano central. Solo el grano central tiene igniter y se espera que los otros 6 se enciendan con el calor, presión y fuego que desprenda este. La lata está recubierta de resina epoxy a fin de que soporte más altas temperaturas.

Test: El test sigue siendo el mismo, encender la etapa y ver como reacciona.

Resultado del test: El igniter funciona y enciende la etapa, esta, pero, explota a pocos instantes de la ignición haciendo volar por los aires los granos que no estaban sujetos, estos al no estar expuestos a presión alguna, se queman cual hoja de papel.


Conclusiones del test: muy importante sujetar TODOS los granos a fin de que si hay una explosión (como ha sido nuestro caso) estos no salgan volando por allí.

Stage2 fifth burn


English
And with this we reach the fifth prototype of the Stage2 and come full of "improvements" (If we use the slang of the Formula 1 can say that for this prototype comes new developments). If recapitulate and reminisced about the rights and wrongs of the other prototypes we have our fifth stage, it consists of an insulating coating of epoxy resin on the inside of the can so that it could withstand the high temperatures generated, in this case we use a configuration central grain surrounded by five others naked grains, in this prototype beans that go around are covered with a layer of resin with fiber, so we contain grains and further protect the can (our weak link) is due to the augment in grain volume so we could not six grains and in the last two prototypes, we have also smoothed the crust of central grain board to laces and entry though pimples. 

Test: More of the same, see the behavior of the can (and grains) in ignition. 

Test result: The igniter fails, and we have many faults, then decided to ignite "manually" via a wick. This goes on and we see a perfect "wake", the can hold the entire process. At the end we see that the nozzle is clear because the resin that hold it has been burned. 

Test conclusions: The test is a success (except that the igniter does not burn the grain), the can (remember, our weak link) hold for the first time a configuration of more than 1 grain. But here, even to amateurs, we are perfectionists and we see that the wake takes "jolts" due to the grains do not burn in unison, this certainly derive a serious departure from the stage if we would launch it. Our next step should be to think of a way to ensure that light up all at the same instant.

Castellano
Y con esta llegamos al quinto prototipo de segunda etapa y viene cargadita de "mejoras" (Si utilizamos el argot de la Formula 1 podriamos decir que para este prototipo nos llegan nuevas evoluciones). Si recapitulamos y rememoramos los errores y aciertos de los otros prototipos tenemos nuestra quinta etapa, esta consta de un recubrimiento aislante de resina epoxy por el interior de la lata para que esta soporte las altas temperaturas que se generan, en este caso utilizamos una configuración de grano central rodeado de otros cinco, en este prototipo los granos que van alrededor estan recubiertos por una capa de resina con fibra, de esta manera contenemos los granos y protegemos aún más la lata (nuestro eslabón débil) es debido a este augmento en el volumen de los granos por lo que no hemos podido seis granos como en las dos últimos prototipos, además hemos limado la corteza de cartón del grano central para poder encagar y hacer entrar bien todos los granos.

Test: Más de lo mismo, ver el comportamiento de la lata (y los granos) en ignición.

Resultado del test: El igniter falla, ya llevamos diversos fallos, entonces se decide a igniciar "manualmente" mediante una mecha. Este se enciende y vemos una perfecta "estela", la lata aguanta todo el proceso. Al final vemos que la tobera se desprende debido a que se ha quemado la resina que lo sujeta.


Conclusiones del test: El test és un éxito (salvo por que el igniter no enciende el grano), la lata (recordamos, nuestro eslabón débil) aguanta por primera vez una configuración de más de 1 grano. Pero aquí, aún que amateurs, somos perfeccionistas y vemos en el test que la estela da "bandazos" debidos a que los granos no se queman al unísono, esto derivaria seguramente en una seria desviación de la etapa si la lanzaramos. Nuestro siguiente paso deberia ser pensar en alguna manera de asegurarnos que se enciendan todos al mismo instante.

jueves, 18 de noviembre de 2010

Stage2 path simulations

English
We continue with our particular space race and now it is the turn of a key part of the project, the balloon. As we have explained our mission consist to reach space by a rocket launched from a balloon, our theory is that saving all the friction on the surface of the earth, we need smaller (and cheaper) rockets to get to space. 
We are still at the beginning of the rocket creation, so we are at our worst case, we have a heavy rocket, amateur fuel, little aerodynamic, etc. so now we can only improve. So we do some behavior simulations of our rocket launched from different altitudes. The initial altitudes are going to give the maximum altitudes for balloons can get from our distributor, you can see in Table #1. In this Table #1 you can see the type which corresponds to the weight, we can see the diameter of the neck which in our case is very important because our private launch ramp is inserted into the nozzle, we can also see the size (Bodylength), payload which is very important because exceed this charge can result in not reaching the desired altitude, the lift that makes you the balloon when it is loaded (Free Lift) and finally the maximum altitude that it can reach (Averl.Altitude). On the other side has been ignored in this table the length of the neck and the rate of climb (which is 350 m/min for all types).
Then we did a simulation with the latest prototype of rocket that have proven (this is the one used in the previous test) with a payload consisting of the GPS-AWIP explained in the entry "Tracking system". So the weights are as follows: 

Structure weight: 128.8 g 
Grains weight: 195.3 g 
Fill Weight: 50 gr 
Payload: 167.8 g 
Total: 541.9 g 

In Table #2 and Graphic #1 we can see the simulation results with the balloon types, burst altitude, Balloon diameter and the Apogee. If we analyze the results we realize that we don't reach our goal, but everything will come, now we must think about how and what to improve in order to reach our goal. Basics, reduce weight of the filling and the payload, every day we work to make the payload and a lighter structure.


Castellano
Seguimos con nuestra particular carrera hacia el espacio y ahora le llega el turno a una parte fundamental del proyecto, el globo. Como hemos explicado nuestra misión consiste en llegar al espacio con un cohete lanzado desde un globo, nuestra teoria es que ahorrandonos toda la fricción que hay en la superficie de la tierra necesitaremos cohetes más pequeños (y baratos) para llegar al espacio.
Aun estamos en los inicios de la creación del cohete, por lo tanto estamos en nuestro peor caso, nos encontramos con un cohete pesado, de combustible amateur, poco aerodinamico, etc. por lo tanto ahora solo podemos mejorar, así pues vamos a hacer unas simulaciónes del comportamiento de nuestro cohete lanzado desde diferentes altitudes. Las altitudes iniciales las van a dar las altitudes máximas a las que pueden llegar los globos de nuestro distribuidor, estos los podeis ver en la Table #1. En esta Table #1 podeis apreciar el tipo (type) que se corresponde con el peso (weight), podemos ver el diametro de la boquilla (Neckdiam.) que en nuestro caso es muy importante pues nuesta lanzadera va insertada dentro de esta boquilla, también podemos ver la envergadura (Bodylength), la carga de pago o carga útil (Payload) muy importante pues sobrepasar esta carga puede tener como consecuéncia no llegar a la altitud deseada, el empuje que te hace el globo cuando esta cargado (Free Lift) y por último la altitud máxima a a que puede llegar (Averl.Altitude). Por otro lado se ha obviado de esta tabla la longitud de la boquilla y la velocidad de ascenso (que es de 350 m/min para todos los tipos).

Entonces hemos hecho una simulación con el último prototipo de cohete que hemos provado (este es el que se utilizó en la anterior prueba) con una carga de pago consistente en el sistema GPS-AWIP explicado en la entrada "Tracking system". Así pues los pesos quedan de la siguiente manera:

Peso estructura: 128.8 gr
Peso granos: 195.3 gr
Peso Relleno: 50 gr
Payload: 167.8 gr
Total: 541.9 gr

En la Table #2 y Graphic #1 podemos ver los resultados de la simulación con el tipo de globo (Type), la altitud màxima del globo (burst altitude), el diametro del globo (Balloon diameter) y hasta donde llega el cohete o apogeo (Apogee). Si analizamos los resultados nos damos cuenta de que no llegamos a nuestra meta, pero todo se andará, tenemos que pensar en como y que mejorar para poder llegar a nuestro objetivo. Lo básico, reducir peso del relleno y el payload, dia a dia trabajamos para hacer ese payload y una estructura más ligera.

Links:
http://www.meteorologyshop.eu/Radiosonding_balloons/ENG_276_EUR_38_0__.html


Table #1:
Overview of deliverable pilot balloons
Type Weight(g)
Neckdiam. (cm)
Bodylength
(cm)
Payload
(g)
Free Lift
(g)

Averl.Altiude (km)
100
1,4±0,3
55 200 480
18,5
200
3,2±0,4
75 300 1150
21,0
300 300±15
3,2±0,4
95 650 950
24,0
500 500±25
3,2±0,4
130 1150 1250
26,5
600 600±27
3,2±0,4
145 1150 1300
28,5
700 700±28
3,2±0,4
160 1150 1300
29,5
800 800±30
3,2±0,4
170 1150 1350
30,5
1000 1000±31
3,2±0,4
180 1150 1400
32,5
1200 1200± 45
3,2±0,4
200 1150 1400
33,5
1500 1500±50
3,2±0,4
220 1150 1500
35,0
2000 2000±80
5,0±0,4
250 1150 1550
37,0
3000 3000±110
5,0±0,4
295 1150 1600
39,0


Table #2:
Type BURST Altitude Balloon diameter Apogee
100gr 18,5 km 0,55 m 24,7 km
200gr 21,0 km 0,75 m 29,0 km
300gr 24,0 km 0,95 m 35,0 km
500gr 26,5 km 1,30 m 40,8 km
600gr 28,5 km 1,45 m 45,8 km
700gr 29,5 km 1,60 m 48,5 km
800gr 30,5 km 1,70 m 51,1 km
1000gr 32,5 km 1,80 m 56,3 km
1200gr 33,5 km 2,00 m 58,8 km
1500gr 35,0 km 2,20 m 62,3 km
2000gr 37,0 km 2,50 m 66,8 km
3000gr 39,0 km 2,95 m 70,8 km

Table #3:
Click on the picture to maximize.
Haz click en las foto para maximizar.


Pictures (Fotos):
Click on the pictures to maximize.
Haz click en las fotos para maximizar.

Picture #1

Picture #2


Graphic #1:

Blue line (Stage2): Behind the points: baloon type; Stage2 apogee. Al lado de los puntos: tipo de globo, apogeo de la Stage2
 Red line (balloon): Burst altitude; altura de explosión

 Graphic #2, #3 & #4:


miércoles, 17 de noviembre de 2010

Stage2 fourth burn


English
We keep testing the Stage2 and before explain and analyze the results of the fourth test we will review progress and findings of the other three tests. 
In the first test we tested the can with a single-engine jet amateur, the results that we see are that the can is heated and deformed through the nozzle thrust, therefore see that the nozzle works. 
In the second test we decided to put 4 engines, the result is that our can exploit a little over a second after being fired, we make a mistake by not covering the inside of the can with more resin to withstand the high temperatures that are reached within the can.In the third test we decided to put 7 grains, but this time only put one with its amateur nozzle and the other six are placed around without the wrapper, with this we want to get more burn time, the result is that the bulkhead is released and the nozzle flies shedding all the content.

In this fourth test we put  7 grain one wrap with cardboard and the other six covered with a layer of resin, to the grain that we don't take off the bundle it will be a bit depress so you can enter the other 6 grains, once put these inside is filled with resin.

Test: As in other cases, the objective of this test is to burn the Stage2 and watch their behavior in order to achieve an stable and reliable stage to reach space.
Test result: we ignite the stage (with our famous FIREBOX), the stage burns and about 3 seconds after it we see how (in milliseconds) there is a leak in the structure resulting in an explosion, then you can see resin burns inside. The nozzle holds perfectly and  is only after a while burning the resin that holds, that this come off, then we also see that the blast open the can in a very curious way then the can cut is nearly perfect as we can see in the video images being opened only by the sides. The bulkhead holds.

Test conclusions: The resin well spread within the can gives greater resistance to pressure and temperature to seeing increased almost twice as long as you hold the nozzle before giving up. The nozzle despite being inaluminum, once cleaned, it looks like new, important to protect the inside with epoxy resin.


Castellano
Seguimos probando la segunda etapa y antes de explicar y analizar los resultados de esta cuarta prueba vamos a analizar los avances y descubrimientos de las otras tres pruebas.
En el primer test probamos la tobera con un solo motor amateur, el resultado es que vemos que la lata se nos calienta y deforma debido o gracias al empuje que da la tobera, por lo tanto vemos que la tobera funciona.
En el segundo test decidimos poner 4 motores, el resultado es que nuestra lata explota al segundo y poco, cometemos un error al no forrar la parte interior de la lata con resina para que resista más las altas temperaturas a las que se llega dentro de la lata.
En el tercer test decidimos poner 7 granos, pero esta vez solo ponemos uno con su tobera amateur y los otros seis se ponen alrededor sin el envoltorio, con esto se quiere conseguir más tiempo de combustión, el resultado es que el mamparo se suelta y la tobera sale volando desprendiéndose todo.

En este cuarto test volvemos a poner 7 granos uno con su envoltorio de carton y los otros seis forrados de una capa de resina, al grano que no se le quita el envoltorio se le rebaja este un poco para que se puedan introducir los otros 6, una vez puestos estos dentro se llena de resina.

Test: Como en los otros casos, el objetivo de este test es el de quemar la segunda etapa y ver su comportamiento a fin de conseguir una etapa estable y fiable para poder llegar al espacio.

Resultado del test: Encendemos la etapa (con nuestra famosa FIREBOX), la etapa se enciende y alrededor de 3 segundos después se ve como (en milésimas de segundo) hay una fuga en la estructura que da como resultado una explosión, luego se puede ver como se quema la resina del interior. La tobera aguanta perfectamente y es solo al cabo de un rato quemando la resina que la sujeta que esta se desprende, luego también vemos que la explosión abre la lata de una manera muy curiosa pues el corte de la lata es casi perfecto como podemos ver en las imagenes del vídeo abriéndose solo por los laterales. El mamparo aguanta.

Conclusiones del test: La resina bien esparcida dentro de la lata nos da una resistencia superior a la presión y temperatura viendo aumentado casi en el doble el tiempo que aguanta la tobera antes de ceder. La tobera a pesar de ser de aluminio, una vez limpiada, se ve como nueva, importante proteger la parte interior con resina epoxy.

lunes, 15 de noviembre de 2010

Tracking system

English
 We want to take a step in our project and we met the tracking, we want to know the path that our rocket does. In another post we talk about APRS, we don't discard it yet, but we will decant to a GPS + Arduino system, the problem of this system is that we need to recover the platform to treat the data, we don't have this problem with the APRS as we receive the coordinates via radio.

GPS installation and configuration
We put a DB-9 female connector to the GPS, we feed it with 5 volts and connect it directly to the computer and we look at the results in the arduino's hyperterminal (speed: 4800 baud).

We can see the results in the annex #1.


The 4 sentence by default that give us the GPS are repeated periodically, we can know the meaning of each frame in the GPS specifications that you can find in the link of the Annex #2 (the GPS does not converge since we are in the lab).

Condition the GPS signal with TTL level converter. Image only use the settings to low because we only want to receive data from GPS, doeth he Transmission cable does not use GPS. 

We use a board made by us based on ATmega (Arduino), this was design  for the WikiSat project and his name is AWIP. 

We went outside with a laptop and switch on the board with the GPS, this converges almost immediately and with startling accuracy. 

As we mentioned at the beginning, the system we have chosen have not wireless transmission and therefore will have to save the data that GPS provide us. And the way this data will be stored in an EEPROM (Programmable ROM) for subsequent extraction and treatment. 

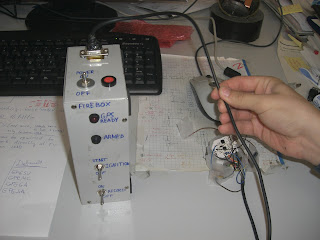
And to end we made up a safe system of ignition, it is a remote control that we call "FIREBOX". It consists of a 9 volt battery with internal circuitry and its most important function is to prevent accidentally rocket launched. First you have to turn on, some LED's warn us that the rocket is armed and the other that the GPS is aligned, once we see that the GPS is aligned, we burn the arduino to below (without wasting time and memory that we have is quite low) ignite the rocket.


Castellano
Queremos dar un paso en nuestro proyecto y nos topamos con el tracking, queremos saber el recorrido que hace nuestro cohete. En otra entrada hablamos del APRS, no lo desechamos aún pero nos vamos a decantar hacia un sistema GPS + Arduino, el problema de este sistema es que necesitamos recuperar la plataforma para poder tratar los datos mientras que con el APRS recibíamos las coordenadas via radio.

Montaje y configuración del GPS:
Ponemos un conector DB-9 hembra al GPS, lo alimentamos con 5 voltios y lo conectamos directamente al ordenador y miramos los resultados en el hiperterminal del arduino (velocidad: 4800 baud).

Podemos ver los resultados en annex #1.

Las 4 "frase" por defecto (default) que nos da el GPS se repiten periodicamente, se puede saber el significado de cada trama en las especificaciones del GPS que podeis encontrar en el enlace del Annex #2 (el GPS no converge ya que estamos dentro del laboratorio).

Acondicionamos la señal del GPS con un convertidor de nivel TTL. De la imagen solo usamos la configuración de a bajo ya que solo queremos recibir datos del GPS, el cable de transmissión hacial el GPS no lo utilizaremos.


Utilizamos una placa hecha por nosotros en base ATmega (arduino), esta se diseñó para el proyecto WikiSat y su nombre es AWIP
 
Salimos al exterior con un ordenador portátil y encendimos la placa con el GPS, este converge casi inmediatamente y con una precisión asombrosa.

Como hemos comentado al principio, el sistema que hemos elegido no dispone de transmisión inalámbrica y por lo tanto se tendrán que almacenar los datos que nos proporciona el GPS. Y la manera de almacenar estos datos sera mediante la EEPROM (memoria ROM programable) para su posterior extracción y tratado.

Ya para terminar nos inventamos un sistema seguro de ignición, se trata de un mando a distáncia que hemos llamado "FIREBOX". Consta de una pila de 9 voltios con una circuiteria interior y su funcion más importante es evitar que se lance el cohete accidentalmente. Primero se tiene que encender, unos leds nos advierten que el cohete esta armado y otro de si el GPS esta alineado, una vez vemos que el GPS esta alineado, ponemos a grabar el arduino para seguidamente (sin perder tiempo ya que la memoria que tenemos es bastante escasa) igniciar el cohete.

Annex #1:
$GPRMC,163918,V,2503.7166,N,12138.4152,E,,,121110,003.5,W*7A
$GPGGA,163918,2503.7166,N,12138.4152,E,0,00,,,M,,M,,*50
$GPGSA,A,1,,,,,,,,,,,,,,,*1E
$GPGSV,1,1,02,21,14,192,00,22,69,310,00*7A
$GPRMC,163919,V,2503.7166,N,12138.4152,E,,,121110,003.5,W*7B
$GPGGA,163919,2503.7166,N,12138.4152,E,0,00,,,M,,M,,*51
$GPGSA,A,1,,,,,,,,,,,,,,,*1E
$GPGSV,1,1,02,21,14,192,00,22,69,310,00*7A
$GPRMC,163920,V,2503.7166,N,12138.4152,E,,,121110,003.5,W*71
$GPGGA,163920,2503.7166,N,12138.4152,E,0,00,,,M,,M,,*5B
$GPGSA,A,1,,,,,,,,,,,,,,,*1E
$GPGSV,1,1,02,21,14,192,00,22,69,310,00*7A
$GPRMC,163921,V,2503.7166,N,12138.4152,E,,,121110,003.5,W*70
$GPGGA,163921,2503.7166,N,12138.4152,E,0,00,,,M,,M,,*5A
$GPGSA,A,1,,,,,,,,,,,,,,,*1E
$GPGSV,1,1,02,21,14,192,00,22,69,310,00*7A
$GPRMC,163922,V,2503.7166,N,12138.4152,E,,,121110,003.5,W*73
$GPGGA,163922,2503.7166,N,12138.4152,E,0,00,,,M,,M,,*59
$GPGSA,A,1,,,,,,,,,,,,,,,*1E
$GPGSV,1,1,02,21,14,192,00,22,69,310,00*7A

Annex #2:
http://static.garmincdn.com/pumac/425_TechnicalSpecification.pdf

Annex #3:
CP210x USB driver
http://www.silabs.com/products/mcu/pages/usbtouartbridgevcpdrivers.aspx

Arduino code:
// ATmega168@16MHz 5V
// Garmin GPS-18x VLC 010-00321-36
// http://www8.garmin.com/manuals/GPS18x_TechnicalSpecifications.pdf
// 1 Bounding.     Vcc (+5)
// 2 White.        Data in. The satellite sends TTL level, NMEA information, from the satellite (Function not used)
// 3 Green.        Data out. The FIRE BOX send TTL level, NMEA information, to the satellite (Function not used)
// 4 Small black.  Igniter 9Vcc. The FIRE BOX provide ground to the Igniter
// 5 Black.       *GND
// 6 Red.         *Armed. The satellite starts to record puting to LOWLEVEL (GND)
// 7 Yellow.      *GPS aligned. The satellite sends a flashing signal 5Vcc
// 8 Small black.  Igniter 9Vcc. The FIRE BOX provide Positive to the Igniter
// 9 -             Not connected
// * Means that should be connected to the satellite
// WARNING: The switches must be in OFF or DOWN position before to plug the wires into the FIREBOX
// This configuration needs a FIREBOX whit a charget 9V battery for the igniter (1.5V Bulb filled with powder and covered by epoxy)
// When de satellite has GPS coverage, the ALIGNED led will flash. Rise the ARMED switch and then rise the LAUNCH to start the ignition
// http://techpubs.sgi.com/library/tpl/cgi-bin/getdoc.cgi?coll=0650&db=bks&fname=/SGI_EndUser/MSB3xx_UG/ch07.html
//
// Battery pack before launch 6.35V


#include <SoftwareSerial.h>
#include <EEPROM.h>
SoftwareSerial GPS = SoftwareSerial(11,13); // SoftwareSerial(rxPin, txPin)
int addr;
int val;
int onair;
byte a[13];
void setup ()
{
  pinMode(12, INPUT); // 12 is the ISP central top pin
  addr = 0;
  val = 36; // '$' 36=00100100
  onair=0;
  a[0] = 0;
  a[1] = 0;
  a[2] = 0;
  a[3] = 0;
  a[4] = 0;
  a[5] = 0;
  a[6] = 0;
  a[7] = 0;
  a[8] = 0;
  a[9] = 0;
  a[10] = 0;
  a[11] = 0;
  a[12] = 0;
  GPS.begin(4800);
  Serial.begin(115200);
}


byte Next()
{
  // BYTE, BIN, OCT, HEX, 1 = number of decimals
  val = byte(GPS.read());
  Serial.print(val, BYTE);
  if(digitalRead(12) == LOW)
  {
    onair = 1;
  }
  return val;
}

void loop()
{
// $GPGSA,A,1,,,,,,,,,,,,,,,*1E
// $GPGSV,2,1,08,02,18,099,00,04,14,066,00,09,50,112,00,22,03,255,00*77
// $GPGSV,2,2,08,25,56,278,00,27,36,117,00,29,24,198,00,30,19,263,00*7E
// $GPRMC,060937,V,4116.5264,N,00159.1348,E,,,131110,000.8,W*77
// $GPGGA,060937,4116.5264,N,00159.1348,E,0,00,,,M,,M,,*52
  if(Next()=='$')
  {
    if(Next()=='G')
    {
      if(Next()=='P')
      {
        if(Next()=='G')
        {
          if(Next()=='G')
          {
            if(Next()=='A')
            {
              //Serial.println(" GPRMC sequence");
              while(Next()!='.');
              // Latitude sequence
              a[0] = Next();
              a[1] = Next();
              a[2] = Next();
              a[3] = Next();
              while(Next()!='.');
              // Longitude sequence
              a[4] = Next();
              a[5] = Next();
              a[6] = Next();
              a[7] = Next();
/*
              while(Next()!=',');
              while(Next()!=',');
              while(Next()!=',');
              while(Next()!=',');
              while(Next()!=',');
              // Altitude sequence
              a[8] = Next();
              a[9] = Next();
              a[10] = Next();
              a[11] = Next();
              a[12] = Next();
*/
            }
            if((addr<512) && (onair==1))
            {
              Serial.println("");
              EEPROM.write(addr, a[0]);
              addr++;
              EEPROM.write(addr, a[1]);
              addr++;
              EEPROM.write(addr, a[2]);
              addr++;
              EEPROM.write(addr, a[3]);
              addr++;
              EEPROM.write(addr, a[4]);
              addr++;
              EEPROM.write(addr, a[5]);
              addr++;
              EEPROM.write(addr, a[6]);
              addr++;
              EEPROM.write(addr, a[7]);
              addr++;
/*
              EEPROM.write(addr, a[8]);
              addr++;
              EEPROM.write(addr, a[9]);
              addr++;
              EEPROM.write(addr, a[10]);
              addr++;
              EEPROM.write(addr, a[11]);
              addr++;
              EEPROM.write(addr, a[12]);
              addr++;
*/
            }
          }
        }
      }
    }
  }
}


Pictures (Fotos):

 Picture #1
Garmin GPS 18x LVC.
Picture #2
TTL level converter, we only use the botom configuration.
Convertidor de nivel TTL, nosotros solo usamos la configuración de abajo.

Link:
http://freecircuitdiagram.com/2009/03/27/simple-ttl-rs232-level-converter-using-transistor/

Picture #3
TTL level converter.
Convertidor de nivel TTL.
Picture #4
Picture #5
Picture #6
GPS + AWIP system in the stage2 nose.
Sistema GPS + AWIP en el morro de la etapa 2.
Picture #7
FIREBOX.
Picture #8
FIREBOX pins
Pins de la FIREBOX

martes, 9 de noviembre de 2010

Destructive can & noozle test (Stage2 second burn)


English
On our way to the validation of components arises we need to put the components to the limit, these components are the famous soda can (with testing and pressure testing) and the nozzle, in the last test results were quite satisfactory in this test we want to limit our cans and nozzles. 

Test: Put the can and the nozzle to the limit, that we will do putting 4 other amateur engines into the can, then analyze the results. 

Test result: The igniters flaunt their reliability and ignite, watching the video in slow motion we can see that is not immediately gone on the 4 but few go on before others (miliseconds). The combustion of these engines takes less than 3 seconds. Before the first combustion second the can burst, we see a clean cut. Before the explosion is possible to see the nozzle to its function has not been calculated yet the thrust. 

Conclusions: We have several theories about the cause of the blowout, one can be that much that can swell in contact with the clamp that can support this cutting off the can, another may be that in the can we put a cut can to strengthen and maintain engines together, so this can may have extensive playing outside and cutting the can (it was a little bad cut). More theories are that can not resist the pressure that a flaw in the can give in under pressure. 
On the other hand we realize that we can not put these engines as it is in the can since they already have their nozzle and when ignited are like torches and we see that in the little time that they are lit before the can burst, it make holes in the interior of the aluminum nozzle, our next goal is to turn the motor fuel only amateur. 
Let us not forget the bulkhead, this will hold.


Castellano
En nuestro camino a la validación de componentes nos urge la necesidad de poner al límite a los componentes, estos componentes son la famosa lata de refresco (puesta a prueba ya con pruebas de presión) y la tobera, en el pasado test los resultados fueron bastante satisfactorios, en este test queremos poner al límite a nuestra lata y tobera.

Test: Poner al límite a la lata y la tobera, esto lo vamos a hacer poniendo 4 motores amateur dentro, después analizar los resultados.

Resultado del test: Los igniters hacen gala de su fiabilidad y se encienden, viendo el vídeo a cámara lenta se ve que no se han encendido al instante los 4 sino que unos se encienden antes que otros (por milésimas). La combustión de estos motores tarda poco menos de 3 segundos. Antes del segundo de combustión nuestra lata revienta, se ve un corte limpio. Antes de la explosión es posible ver a la tobera hacer su función, no se ha calculado aún el empuje.

Conclusiones: Tenemos diversas teorías sobre la causa del reventón, una puede ser que la lata se hinchara tanto que al contacto con la abrazadera que la soporta esta cortara la lata, otra puede ser que dentro de la lata pusimos una lata recortada para reforzar y mantener juntos los motores, así que esta lata puede haberse dilatado tocando la lata exterior y cortándola (ya que estaba un poco mal cortada). Más teorías, que la lata no aguante la presión, que una imperfección en la lata cediera por la presión.
Por otra parte nos damos cuenta que no podemos poner estos motores tal cual dentro de la lata ya que estos ya tienen su tobera y cuando se encienden son como sopletes y vemos que en el poquisimo tiempo que estos estan encendidos antes de que la lata reviente, hacen agujeros en la parte interior de la tobera de aluminio, nuestro próximo objetivo es encender solo el combustible del motor amateur.
No nos olvidamos del mamparo, este aguanta perfectamente.


Pictures (Fotos):

 Picture #1
Picture #2
Picture #3
Picture #4
Picture #5
Picture #6
 Picture #7
Picture #8
Picture #9

Picture #10
Picture #11
Picture #12

miércoles, 3 de noviembre de 2010

Igniter & noozle test (Stage2 first burn)


English
In the last test we did the igniter decided to change the mode coupling the igniter with cable. In the other test we did was hook up the igniter "bare" (just the powder-filled bulb) inside the engine, seen the problems and the time it cost us to connect the cable to the igniter when to launch, we came up with the igniter with a 15 cm cable soldered to a connector at the other end, so we save time in preparation for takeoff, that we can release the igniter while we are trying to plug the cable into the rocket motor and cable as the cable is attached to the rocket burn, so it's better than blowing a 15-cm cable that does not have to go cutting a 150 cm. So we have a soldier igniter cord of 15 cm and epoxied to a motor amateur (for when we try) ready to be assembled in a rocket to be launched.

Test: Testing the "new" igniter, an amateur engine support for both tests and test a prototype nozzle. To this is to use a standard steel support where we are going to make a hole to pass the engine and we will weld a bracket to hold the can and it does not move, then we'll screw it to the ground (if case).


Test result: The igniter works perfectly, the engine is on and on for about 3 seconds, the can has a deformation.

Conclusions: At first we thought that the narrowing was an inplotion but later saw that no, due to heating of the can and push the nozzle, this is the shape of the can, in principle this is not a bad result because it shows that the nozzle works. The next step is to measure the nozzle thrust, that we'll make getting a hydraulic jack with a pressure sensor.


Castellano
En el último test que le hicimos al igniter decidimos cambiar el modo de acople del cable con el igniter. En los otros test lo que hacíamos era enganchar el igniter "pelado" (solo la bombilla llena de pólvora) en el interior del motor, vistos los problemas y el tiempo que nos costaba conectar el cable con el igniter a la hora de hacer el lanzamiento, se nos ocurrió crear el igniter con un cable de unos 15 cm ya soldado con un conector en el otro extremo, de esta manera nos ahorramos tiempo de preparación para el despegue, que se nos pueda desenganchar el igniter mientras estamos intentando conectar el cable dentro del motor del cohete y cable ya que el cable que va conectado al cohete se quema, así que es mejor que se queme un cable de 15 cm que no tener que ir cortando uno de 150 cm. Así pues tendremos un igniter soldado a un cable de 15 cm y pegado con resina a un motor amateur (para cuando hagamos pruebas) listo para ser ensamblado en un cohete y para ser lanzado.

Test: Probar el "nuevo" igniter, un soporte para motores amateur para hacer tests y a la vez probar un prototipo de tobera. Para esto se va a usar un soporte de acero estandarizado donde le vamos a hacer un agujero para que pase el motor y le vamos a soldar una abrazadera para sostener la lata y que no se mueva, luego vamos a atornillarlo al suelo (por si a caso)

Resultado del test: El igniter funciona perfectamente, el motor se enciende y esta encendido durante unos 3 segundos, la lata sufre una deformación.

Conclusiones: En un principio pensamos que el estrechamiento era una implosión pero que más tarde vimos que no, que debido al calentamiento de la lata y al empuje de la tobera, esta es la que deforma la lata, este en principio no es un mal resultado ya que nos demuestra que la tobera funciona. El siguiente paso es medir el empuje que nos da la tobera, esto lo vamos a conseguir poniendo un gato hidráulico con un sensor de presión.

Pictures (Fotos):

 Picture #1
 Picture #2
 Picture #3
 Picture #4
 Picture #5
 Picture #6
 Picture #7
Picture #8